
The Rise of Cold Foam and How to Make It
We like to keep an eye and ear out for new trends in coffee, and drinks in general. And, at the minute, all we hear is "cold foam", "cold foam" and " c o l d f o a m".
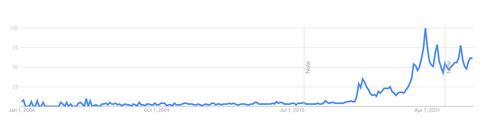
The image above is taken from Google Trends for the search term 'Cold foam' in Australia, showing search interest over time since 2004.
We weren't going crazy either, Google Trends shows cold foam is also on the rise with the sharp increase in the chart above.
So we thought we'd get to the bottom of what cold foam is and how you can make it.
What Is It?
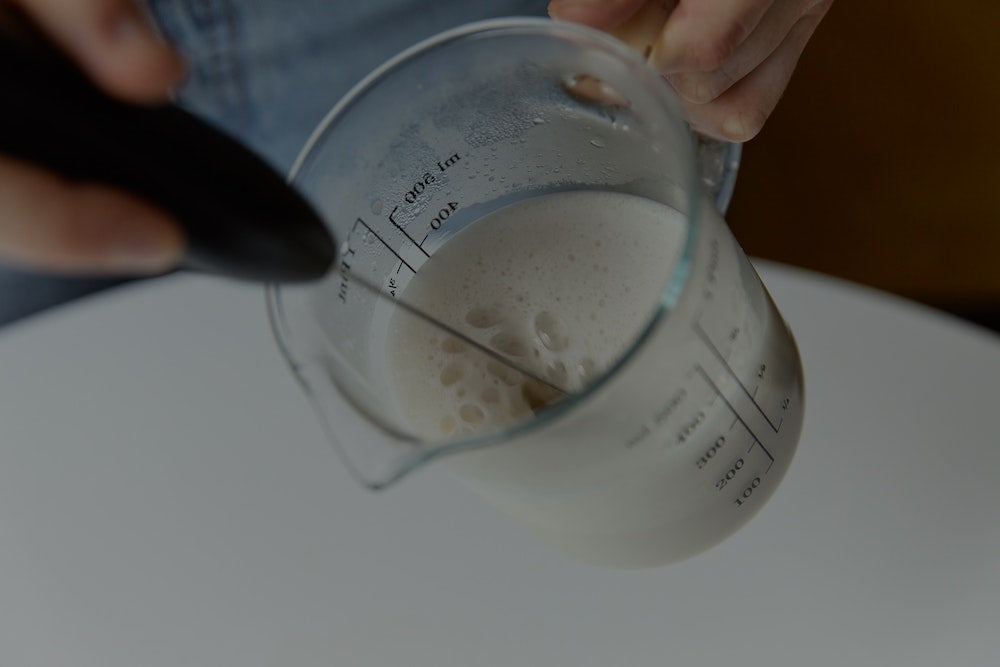
Cold foam is simply just foamed milk that is *cold*! That's it! It might seem silly to really give it this much air time, but when you realise we're normally making foamed milk with a hot steam wand, you'll notice there's a technique in making it cold.
Interestingly, cold foam actually works best with skimmed milk, as opposed to our normal suggestion that full cream milk gives the best foam for latte art. That's because when we're making cold foam, we're interested in the highest protein content per mL, which skimmed milk takes the lead with!
Next, let's discuss how you can make it...
How To Make Cold Foam
For cold foam, we'll be stepping back from the espresso machine steam wand for this one and turning to some other (very affordable) tools.
We need to BUILD the foam cold, so using a steam wand won't work here because as soon as our foam touches ice the temperature change will cancel all of our foam that we built.
So, for cold foam we recommend making it either with a handheld mini whisk (some just refer to this as a 'milk frother') or a milk frothing jug that has a cold foam setting. If you want to use the tools you already have, you can even make this foam with a French Press.
1. Handheld Mini Whisk/ 'Milk Frother'
This one is a very affordable way to get started. You can pick up a handheld mini whisk from places like Daiso in Australia for around $5-$10 AUD and once you have the batteries for it you can get started. That's right, we said batteries so this one is good for taking with you on the go as well.
Simply pour out your milk into a jug and tilt to the side to froth and build up the walls of microfoam. Simple!
2. Milk Frothing Jug with Cold Foam Setting
Next, this one will require a slightly more technical piece of kit that is a milk frother jug that has a cold foam setting. We like this one as you can simply put the milk in and press and leave it to work its magic. Electrical frothing jugs like this can be removed from their base and cleaned but be careful to avoid getting the electrical base wet. This piece of kit will also come with a hot foam setting so you can also make hot milk foam in there too, but we find it's not normally the right type of foam to make latte art with. But if you want one piece of kit to make both a good cappucino and cold foam, this one works best.
3. French Press (and some energy)
Finally, the french press can actually whip up some decent milk froth! It might seem a little unconventional, but thanks to the mesh on the plunger catching the milk film you can form a decent froth. Simply add milk to the empty french press, ensuring the milk fills at least a third of the french press. Then, whilst supporting the base, vigorously move the plunger back and forth to create form. You'll need to be quite energetic to produce a decent foam so roll back those sleeves and get to work.
The energy here comes from you, not batteries or electricity. So this is why we love the french press as our coffee device of choice when we're camping or roadtripping.

Leave a comment
This site is protected by hCaptcha and the hCaptcha Privacy Policy and Terms of Service apply.